

Free access to the internet is your right.
RenrenVPN is afree, open-sourceone-click self-built VPN tool. You only need to prepare an overseas server and fill in a few pieces of information on the webpage. The rest of the installation, certificates, firewall, and protocol configuration will be completed automatically. After installation, a few clicks on the management page will allow you to share the VPN with family and friends.
- Simple: The entire process is operated on the webpage, no commands need to be typed.
- Secure : The server belongs only to you and is not shared with strangers; we do not collect any information. The server password is only used for this one-time installation and is cleared immediately after installation.
- Free and Open Source : The software is completely free, and the code is publicly available on GitHub:https://github.com/iwantruncom/renrenVPN
Below is the complete process of our actual installation on a brand new server. Just follow along.
Preparation: An Overseas Server
Don't have a server yet? Read this first:Server Purchase Tutorial.
- Configuration : 1 CPU core and 1GB of memory are sufficient; choose the cheapest plan.
- System : RecommendedUbuntu 22.04 / 24.04 orDebian 12.
- Region : Prioritize Asian countries; for the US, prioritize Los Angeles.
- Must have a public IPv4 address.
After purchasing, find these four items on the server provider's "Server Details" page. You will need them later:
| Information | Usually called in English | Description |
|---|---|---|
| IP Address | IP Address | Similar to45.76.12.34 |
| SSH Port | SSH Port | Usually22 |
| Username | Username | Usuallyroot |
| Password | Password / root password | Generated by the merchant or set by yourself |
Step 1: Open the RenrenVPN online installation page
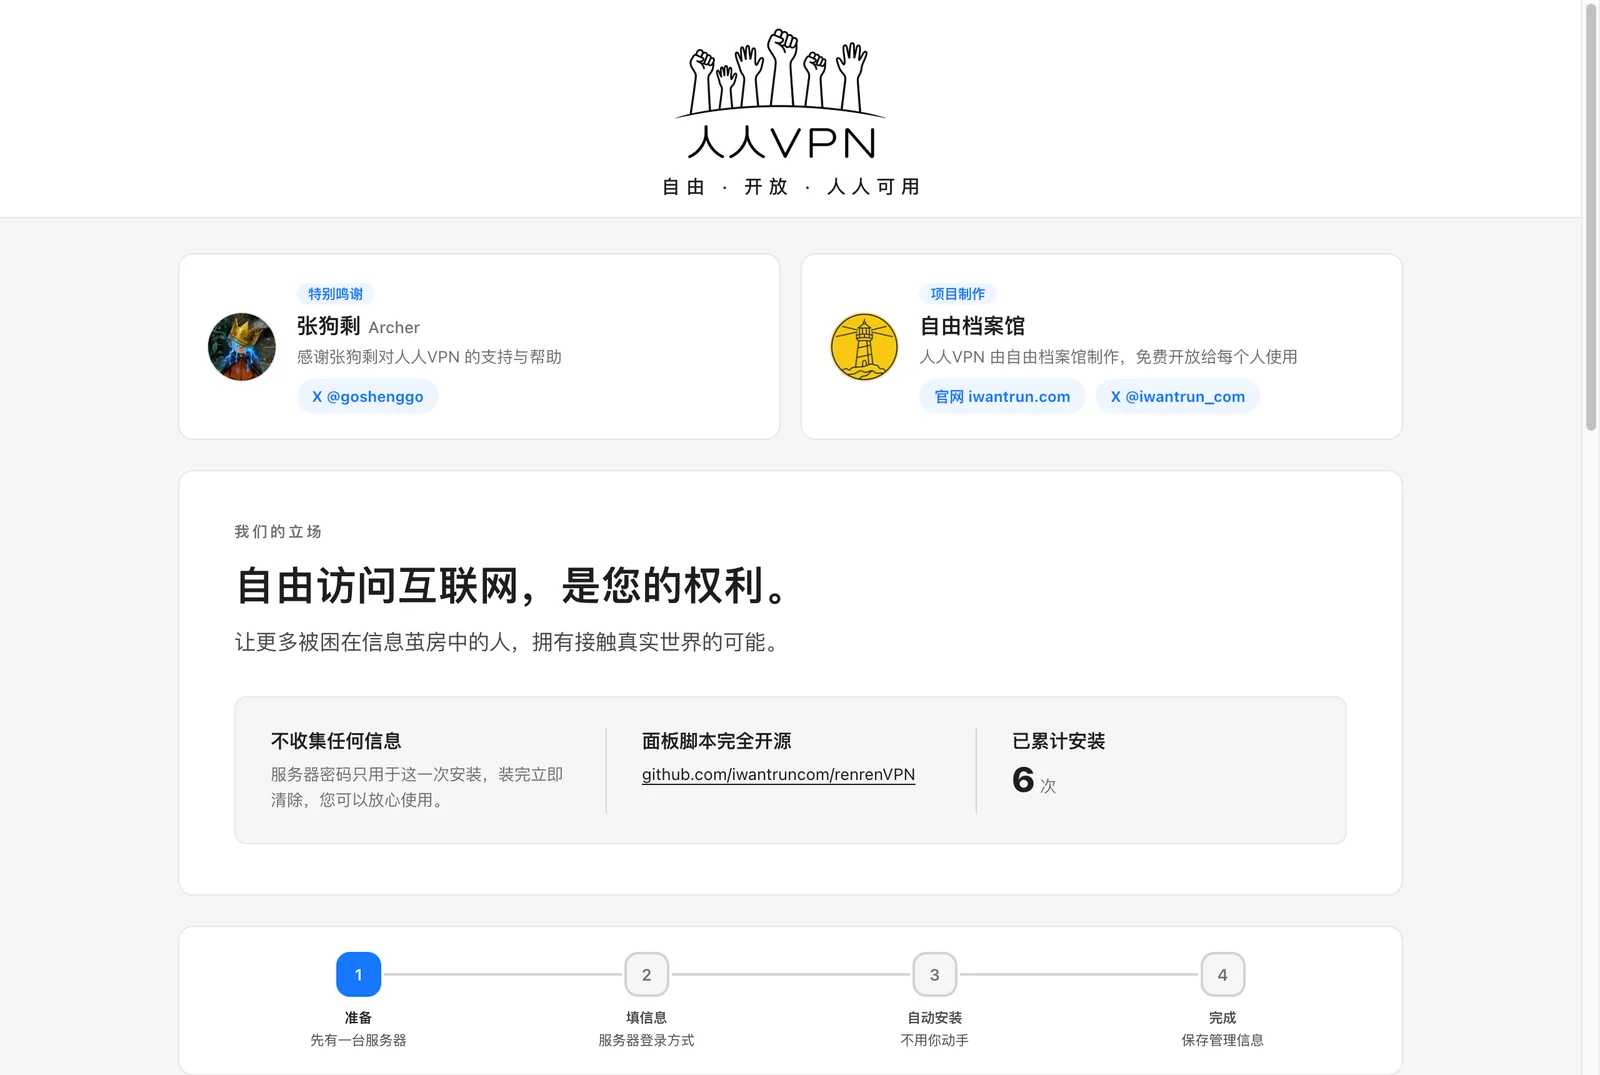
Open with a computer browser https://renrenvpn.com/.
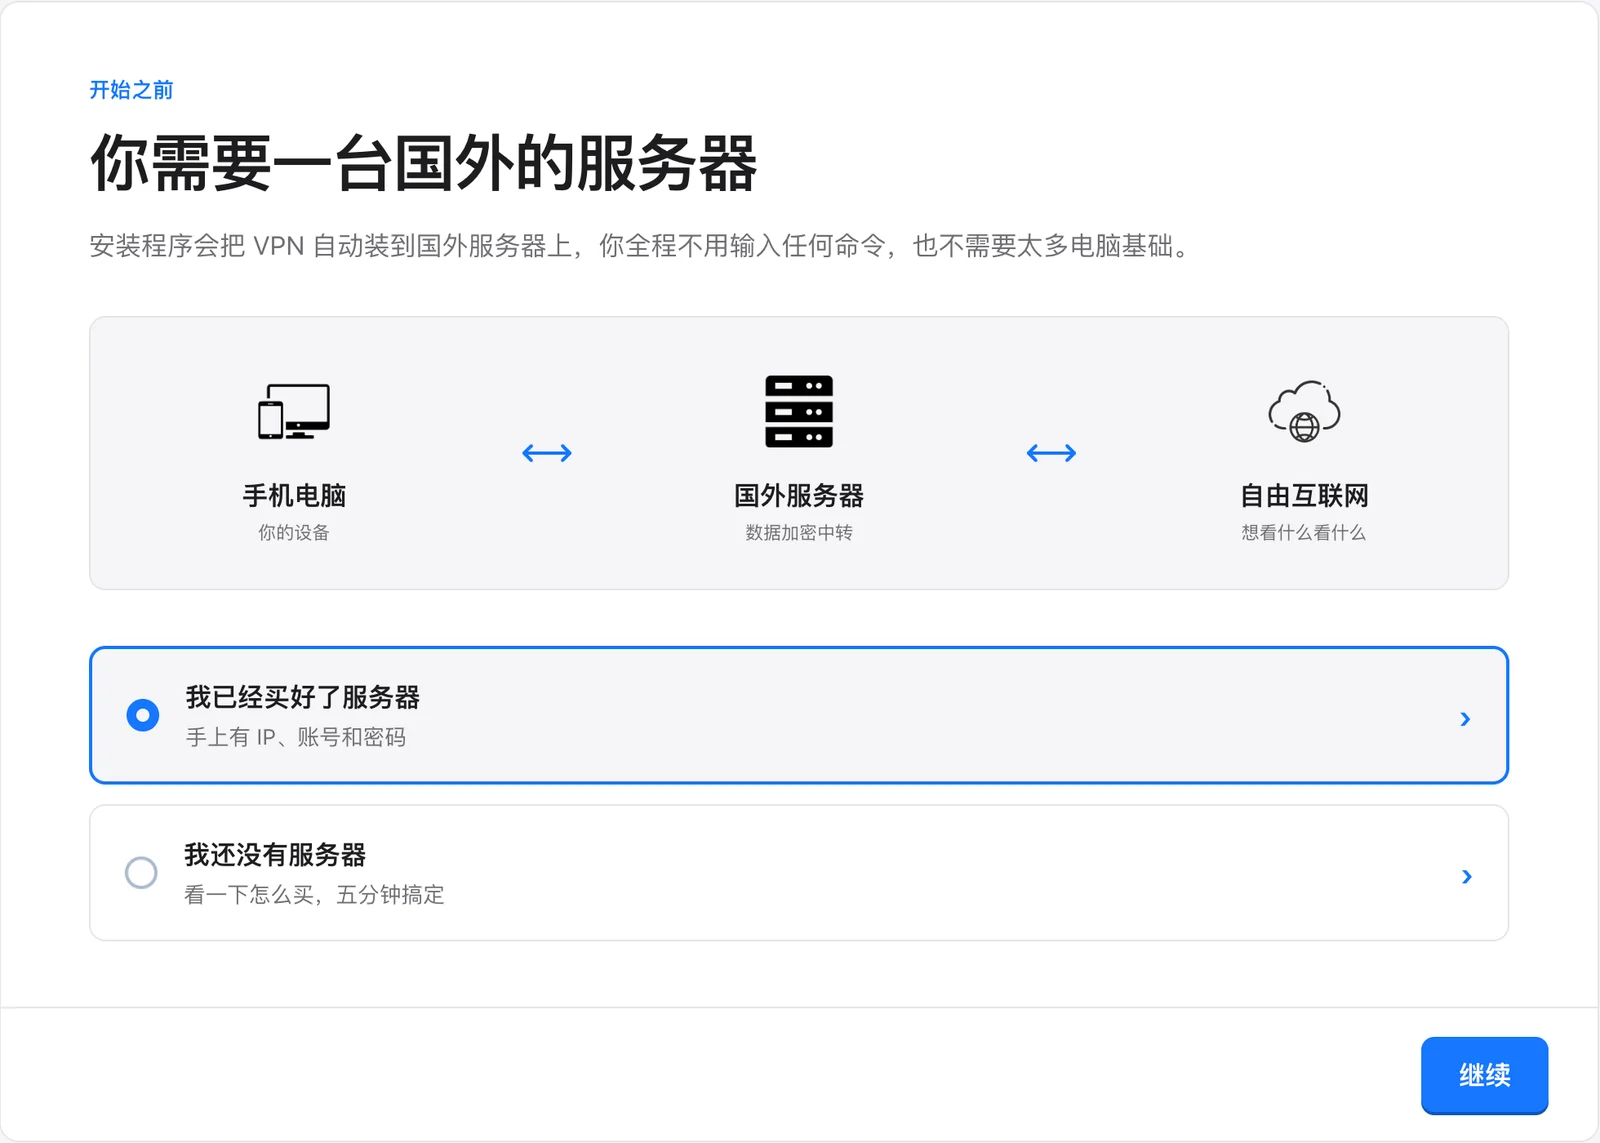
Step 2: Select “I have already bought a server”
Scroll down to “Before you start”, selectI have already bought a serverand click the bottom right cornerContinue.
If you don’t have a server yet, select “I don’t have a server yet”, and the page will provide purchasing instructions.
Step 3: Fill in server information
Fill in the four items you just prepared:
- Server IP address: Paste your server IP.
- Port number: Keep the default
22If you are unsure, do not change it. - Username: Keep the default
rootIf you are unsure, do not change it. - Login methodSelect “Use password”, and enter the server password.
The human verification at the bottom of the page will complete automatically. After a blue checkmark appears, clickStart installation.
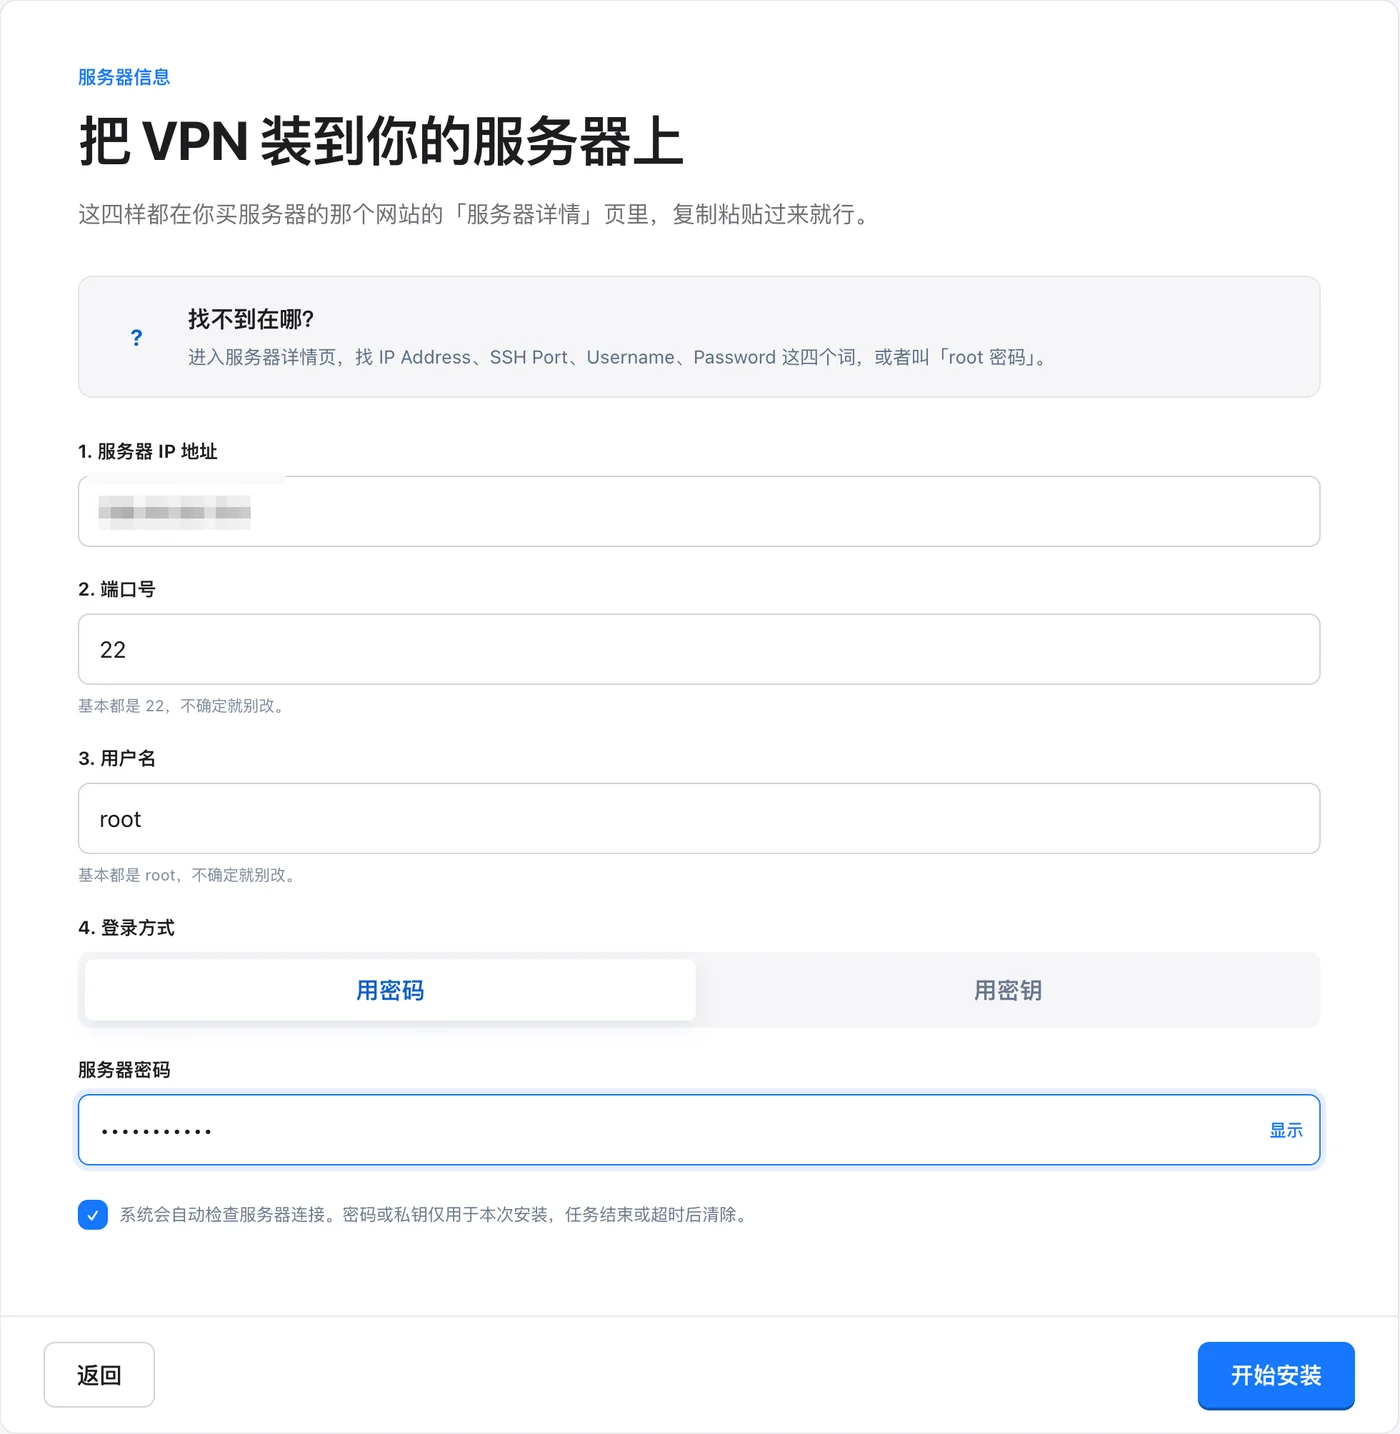
🔒 The server password is only used for this installation and will be cleared immediately after the task is completed. We will not save it.
Step 4: Wait for automatic check and installation
After clicking “Start installation”, the system will first automatically perform four checks:Connect to server, check server, check download network, check management port。After all display “Pass”, installation will start automatically.
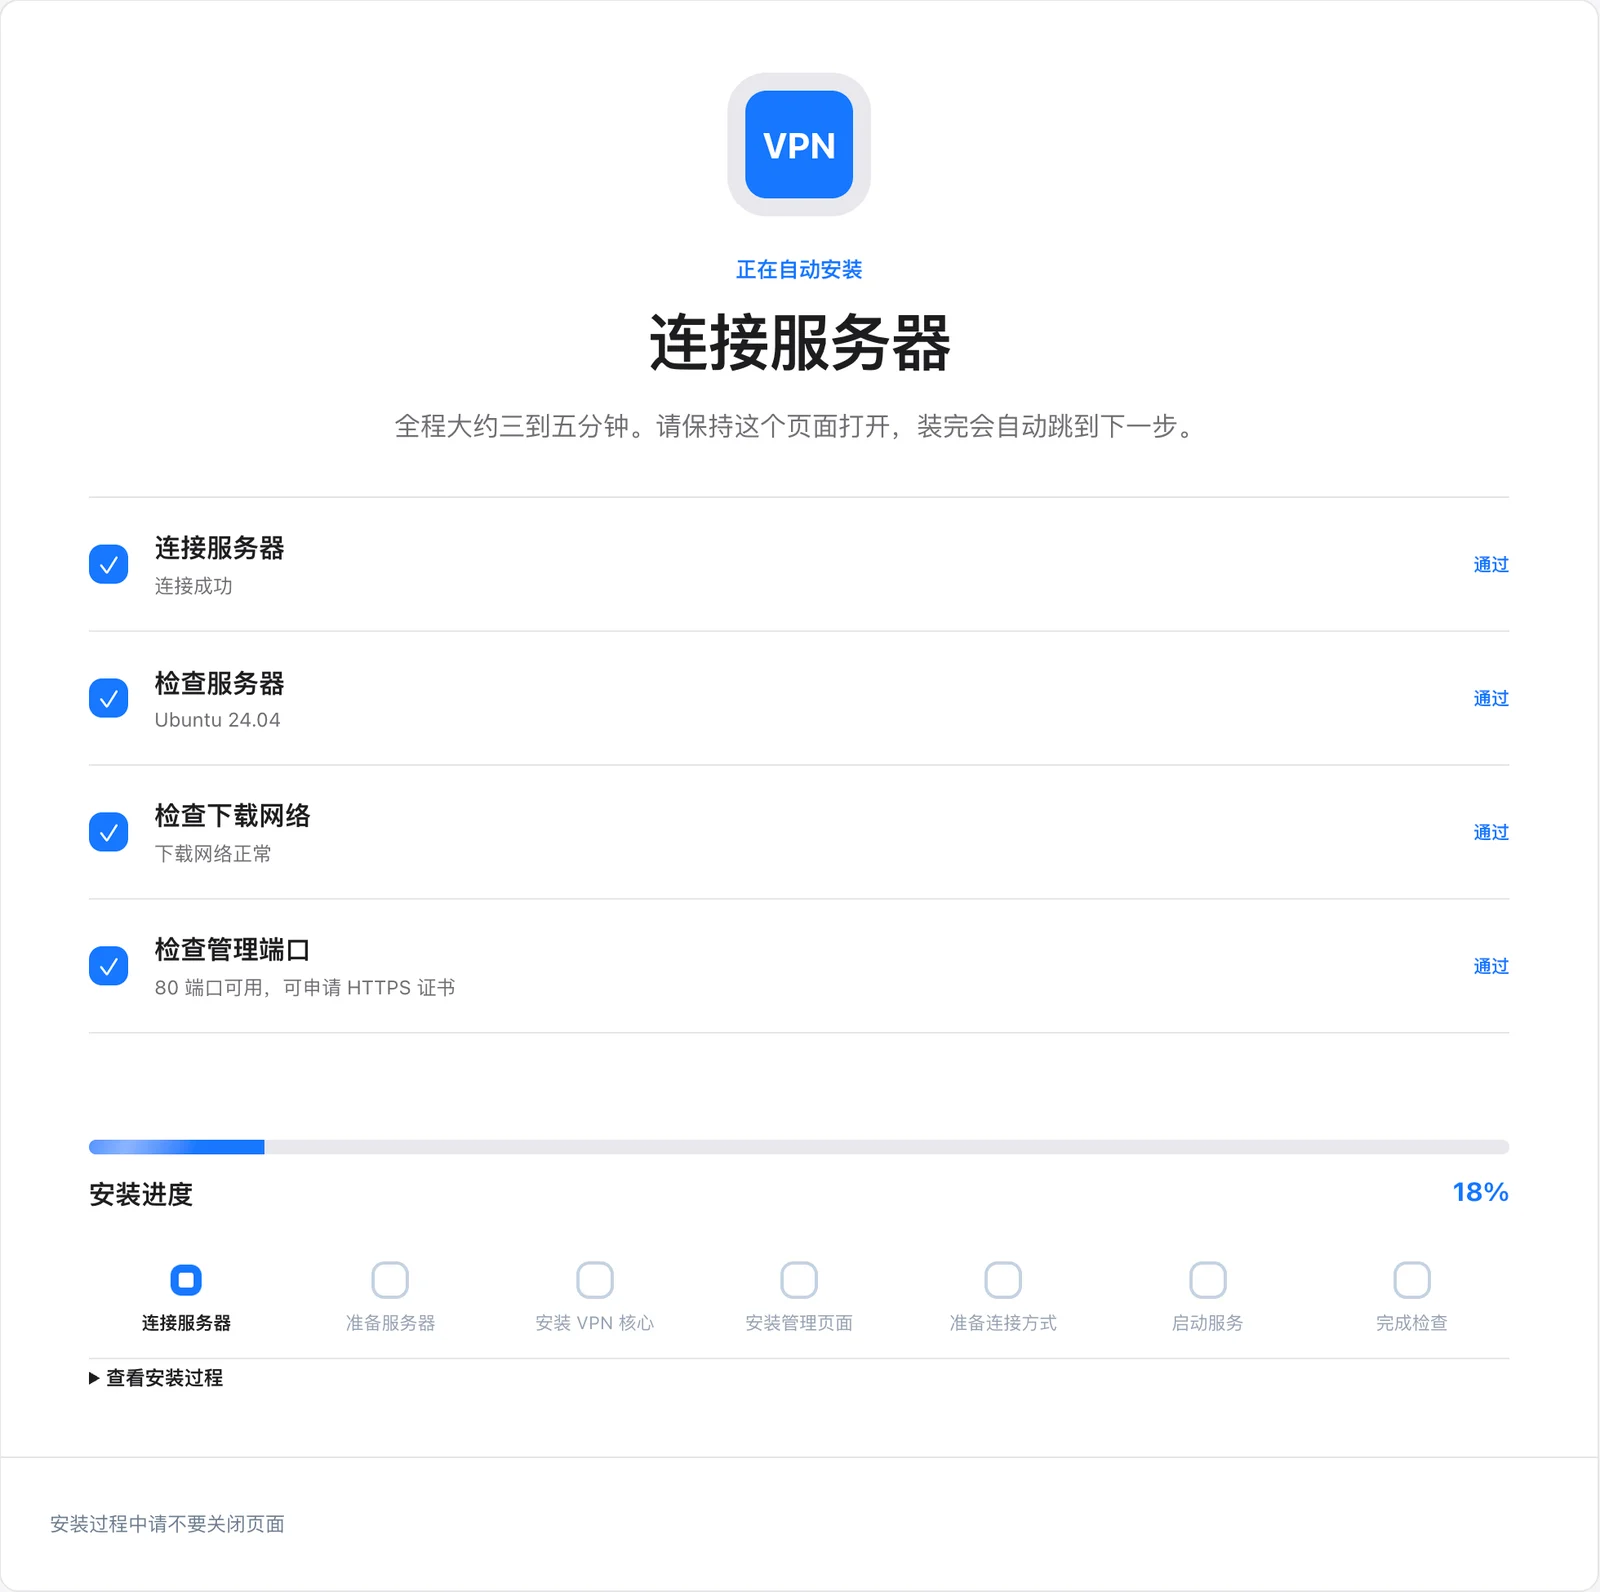
During installation, the progress bar will move forward, and the seven stages below will be checked in order. The whole process takes about 3 to 5 minutes, during whichdo not close the page.
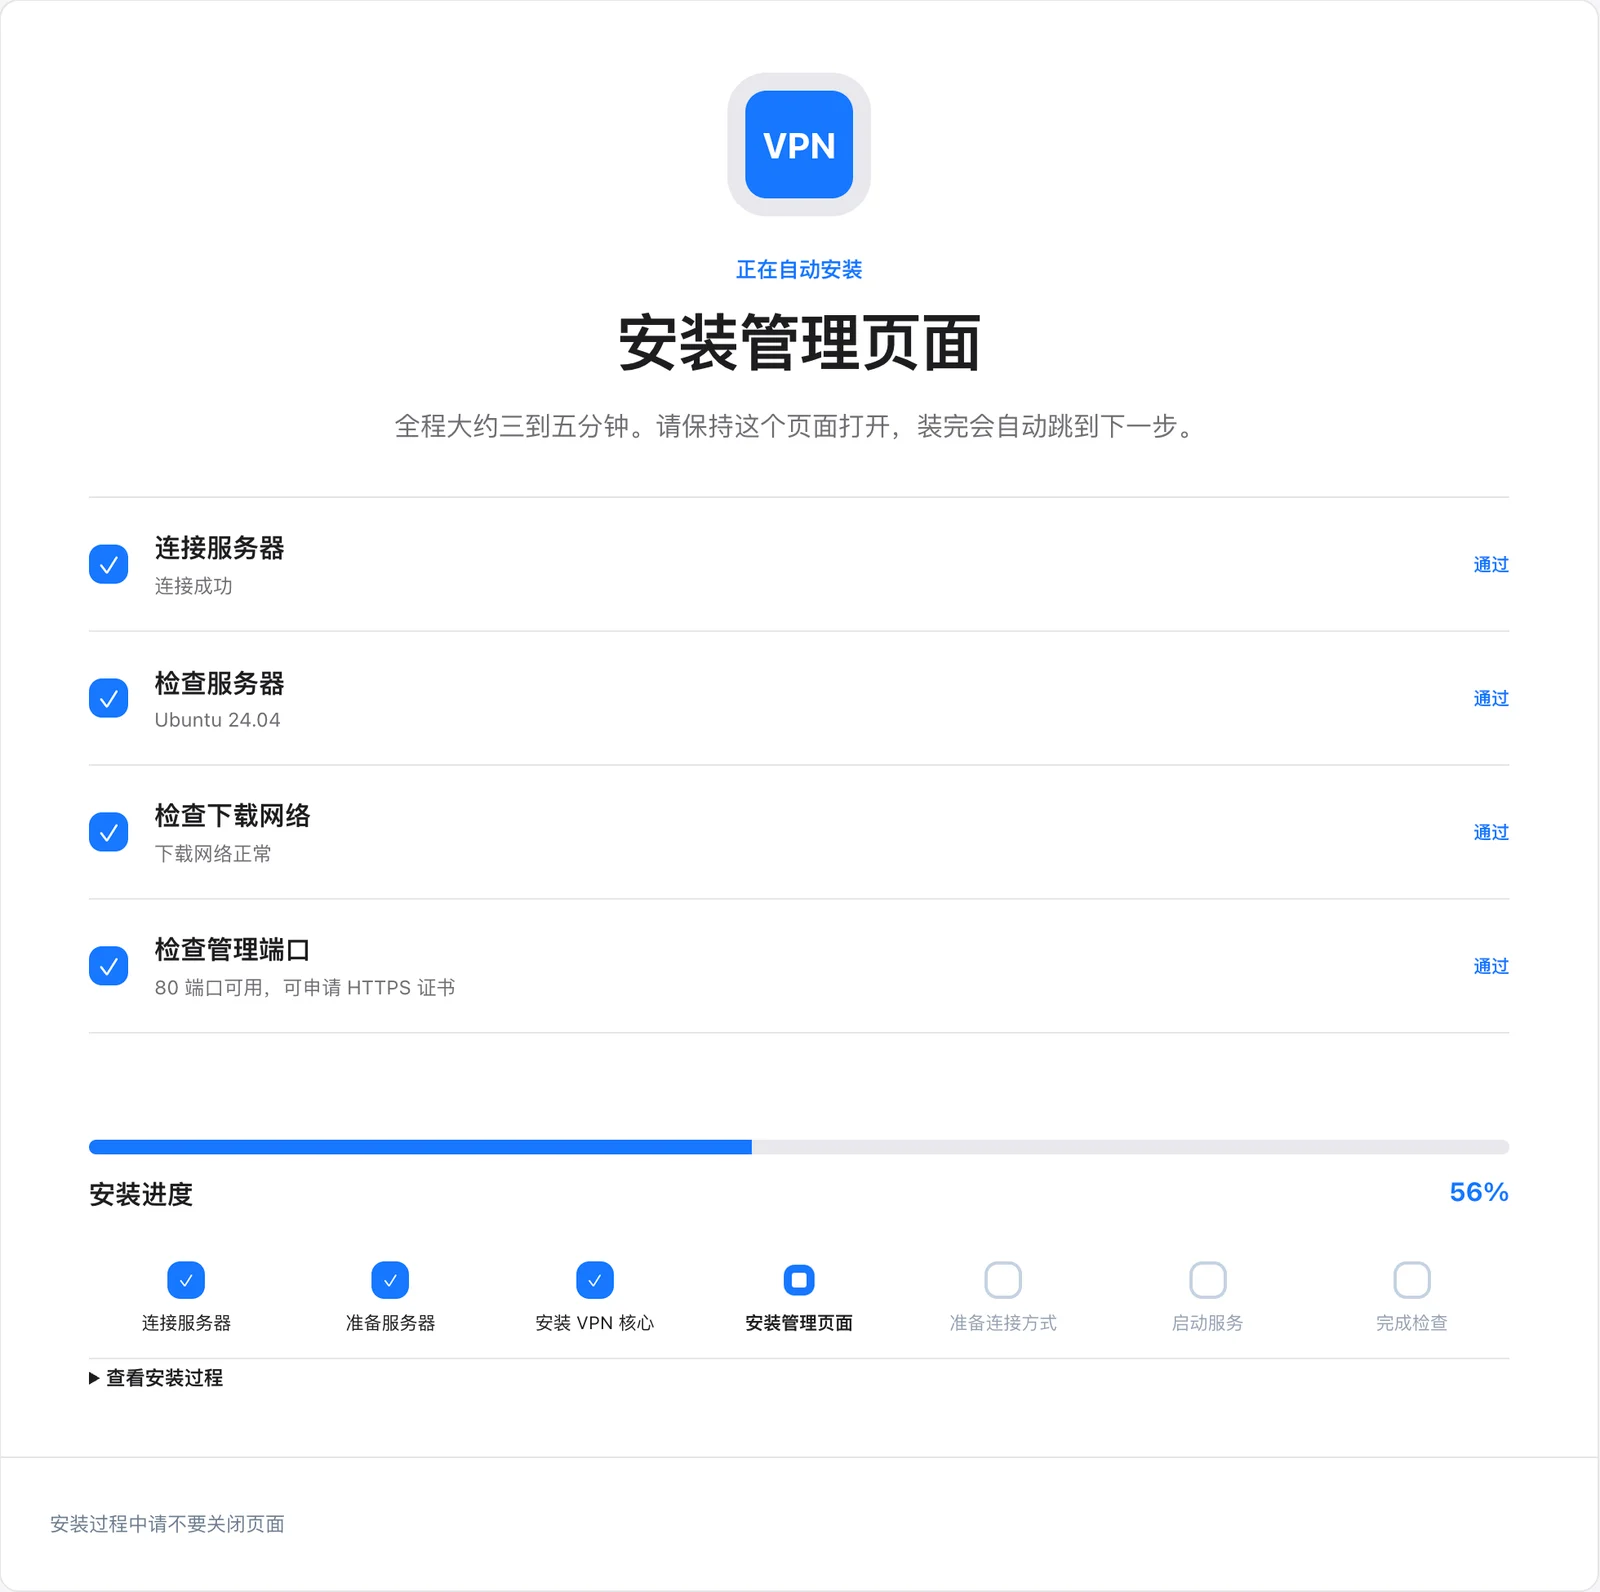
Want to see what is being done specifically? Click “View Installation Process” at the bottom of the page to see the detailed log.
Step 5: Save management information (Important!)
See “Your VPN is installed” to indicate successful installation. The page will display:
- Management Page:The URL for managing the VPN in the future
- Management Account:Default is
admin - Management Password:Randomly generated password
- Needs to be released:Server needs to open ports
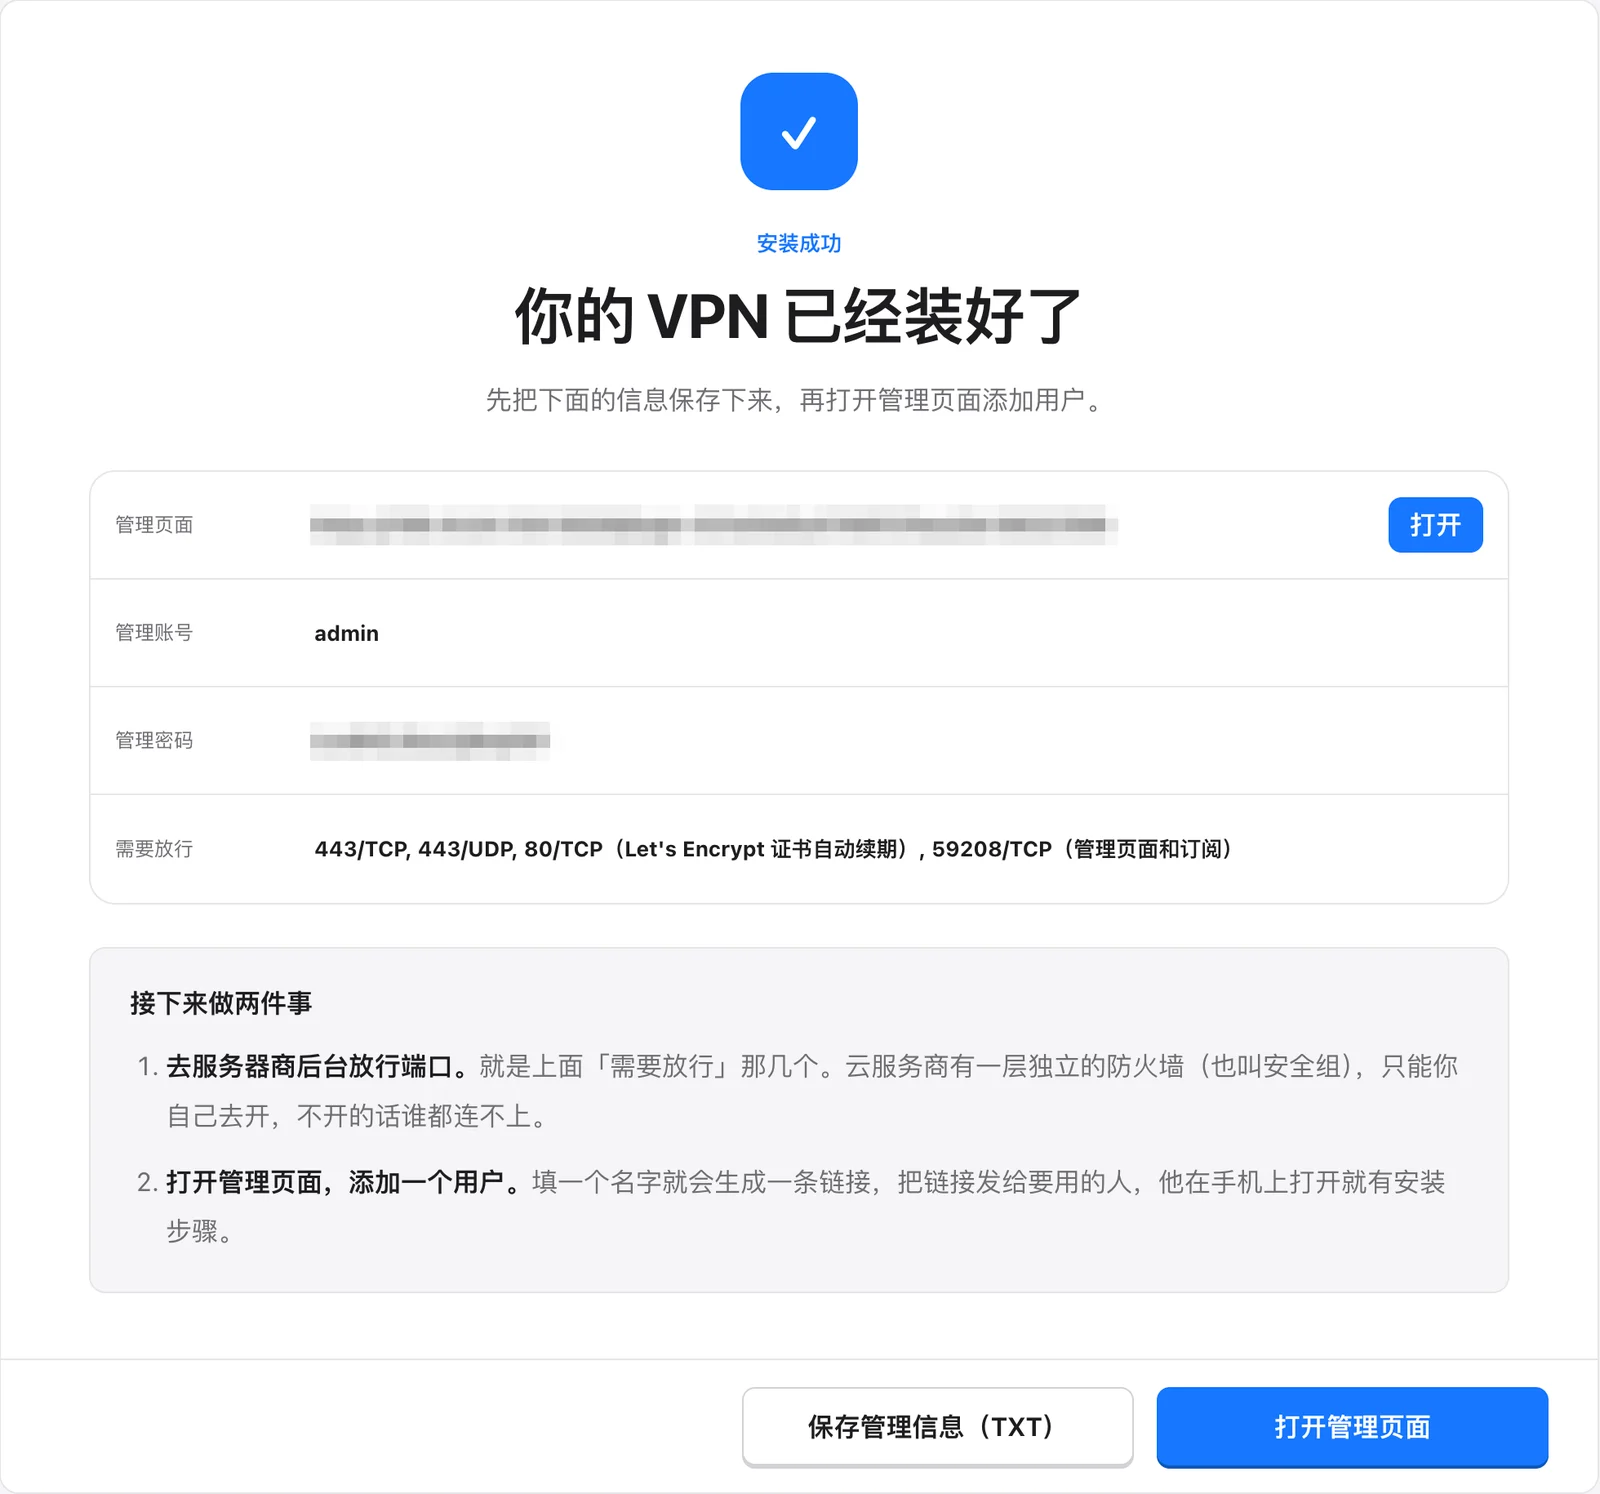
⚠️ The management password will only be displayed this time! Please click 「Save management information (TXT)” Download and save, or take a screenshot.
Next, do two things:
- Go to the server provider's backend to release the ports.Some server providers have a separate firewall layer (also called a "security group"), which requires you to open the ports mentioned above as "requiring release" in the provider's backend. Otherwise, no one can connect. If your provider does not have this setting, you can skip this step.
- Open the management page and add a user. Click the “Open management page” in the lower right corner.
Step 6: Log in to the management page
In the opened page, enter the previously savedManagement AccountandManagement Passwordand clickLogin.
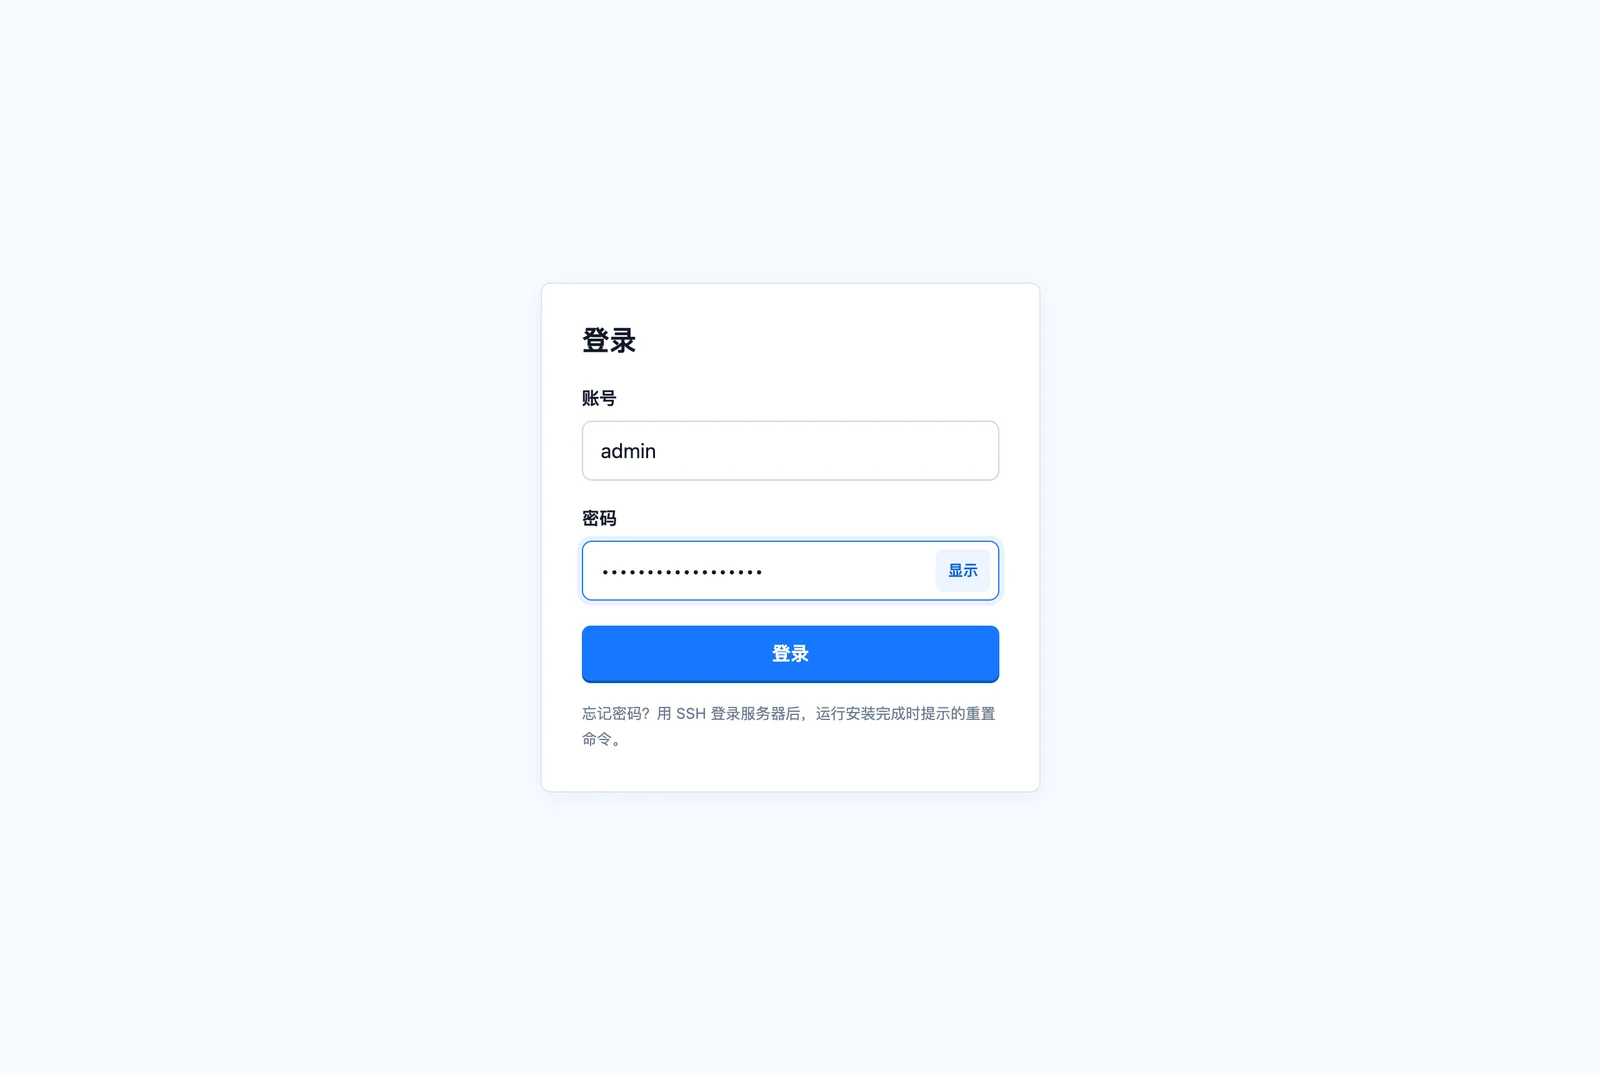
The management page uses a legitimate HTTPS certificate, so the browser will not display any security warnings.
Step 7: Follow the new user guide to add the first user.
The first login will automatically pop up the “New User Guide” (you can also click “New User Guide” in the upper right corner of the overview page at any time to open it again).
First, give a name to the person or device that will use the VPN, for example, “baba”, “mama”, “” or “my_phone”.and clickAdd.
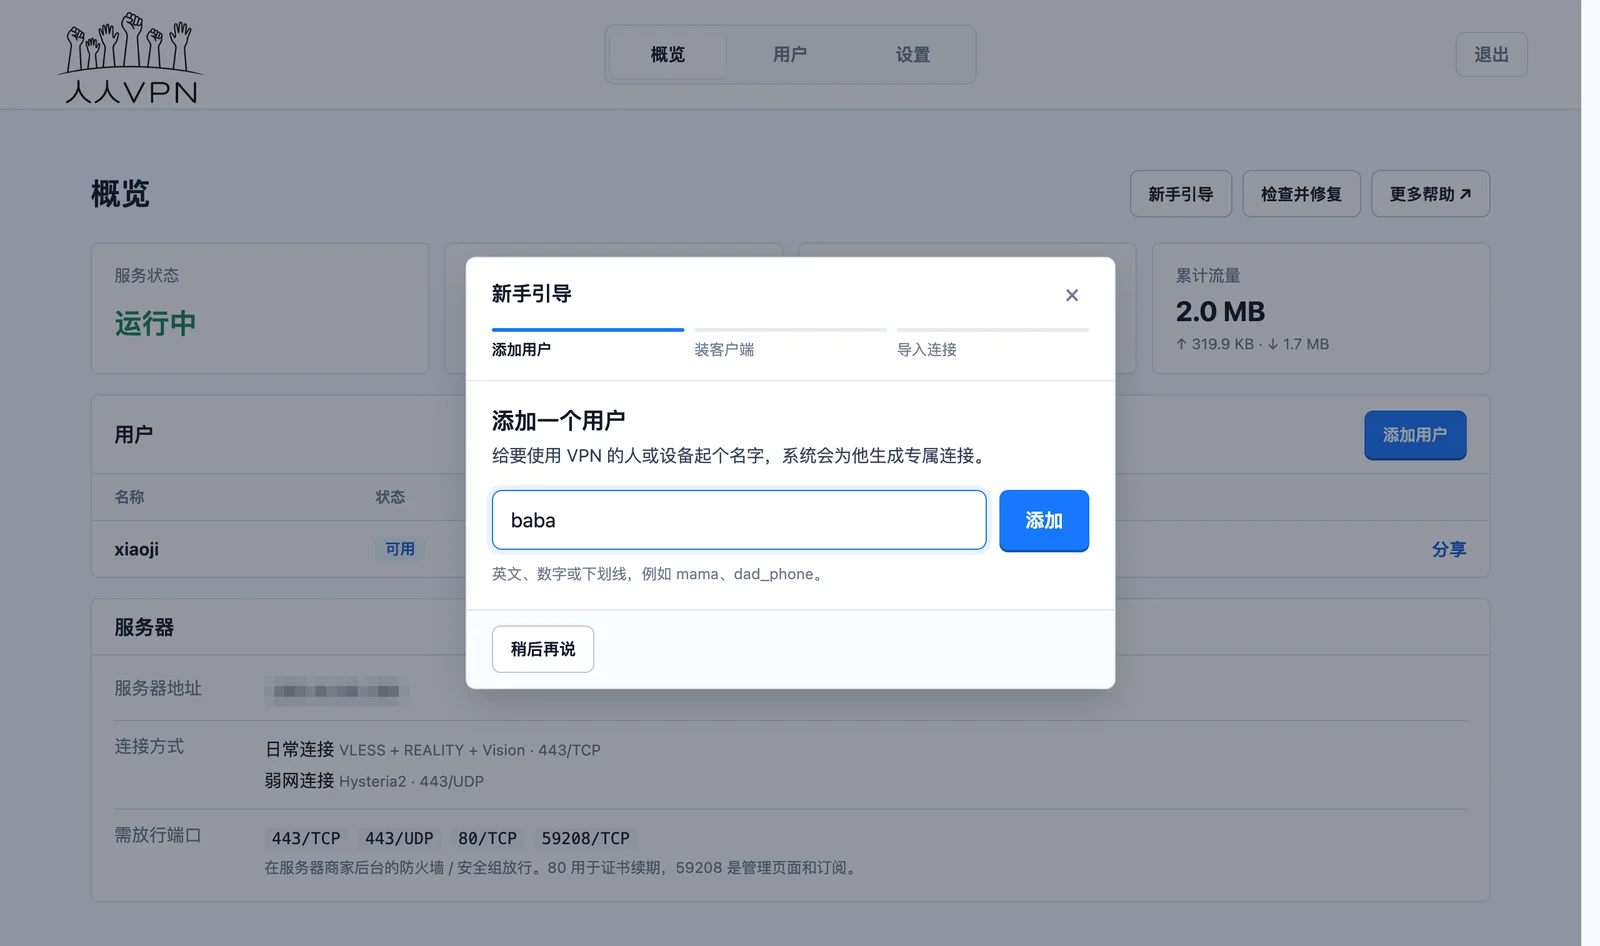
Names can only contain English letters, numbers, or underscores.
Step 8: Install the client on this device
The guide will automatically identify the device you are currently using and recommend the corresponding client. Click “Download Latest Version” to install it, then click “Installed, Continue” in the lower right corner.
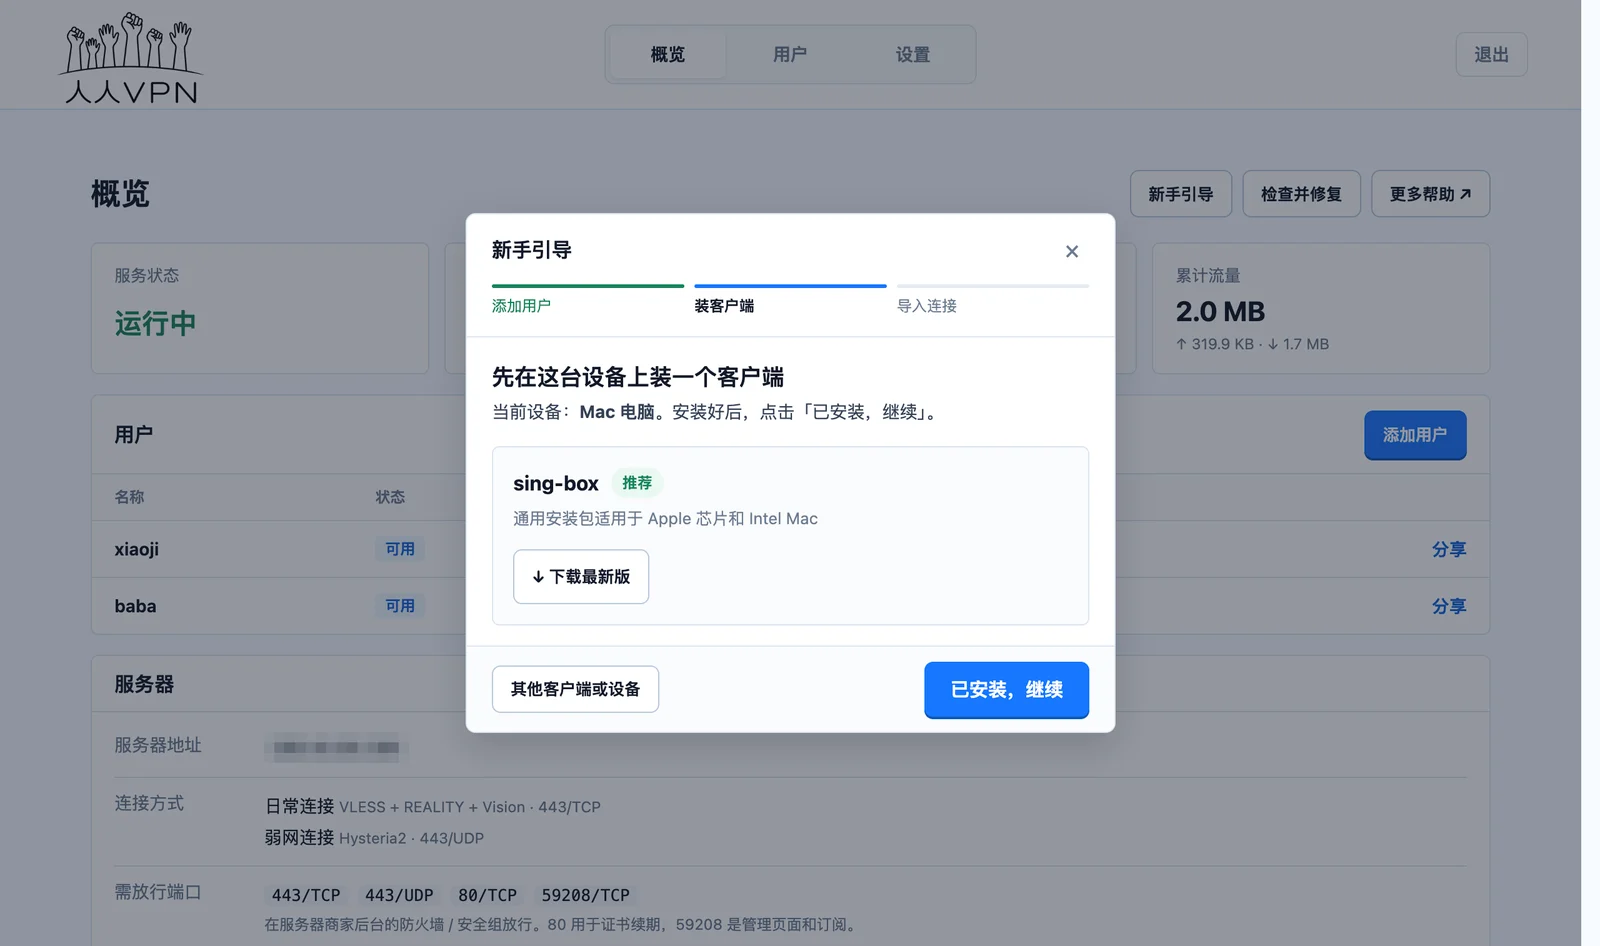
Want to install on another device? Click “Other Clients or Devices” in the bottom left corner.
Step 9: One-click import connection
Click “One-click import to sing-box”, confirm the import in the opened client, and thenTurn on the client’s connection switchto access the internet!
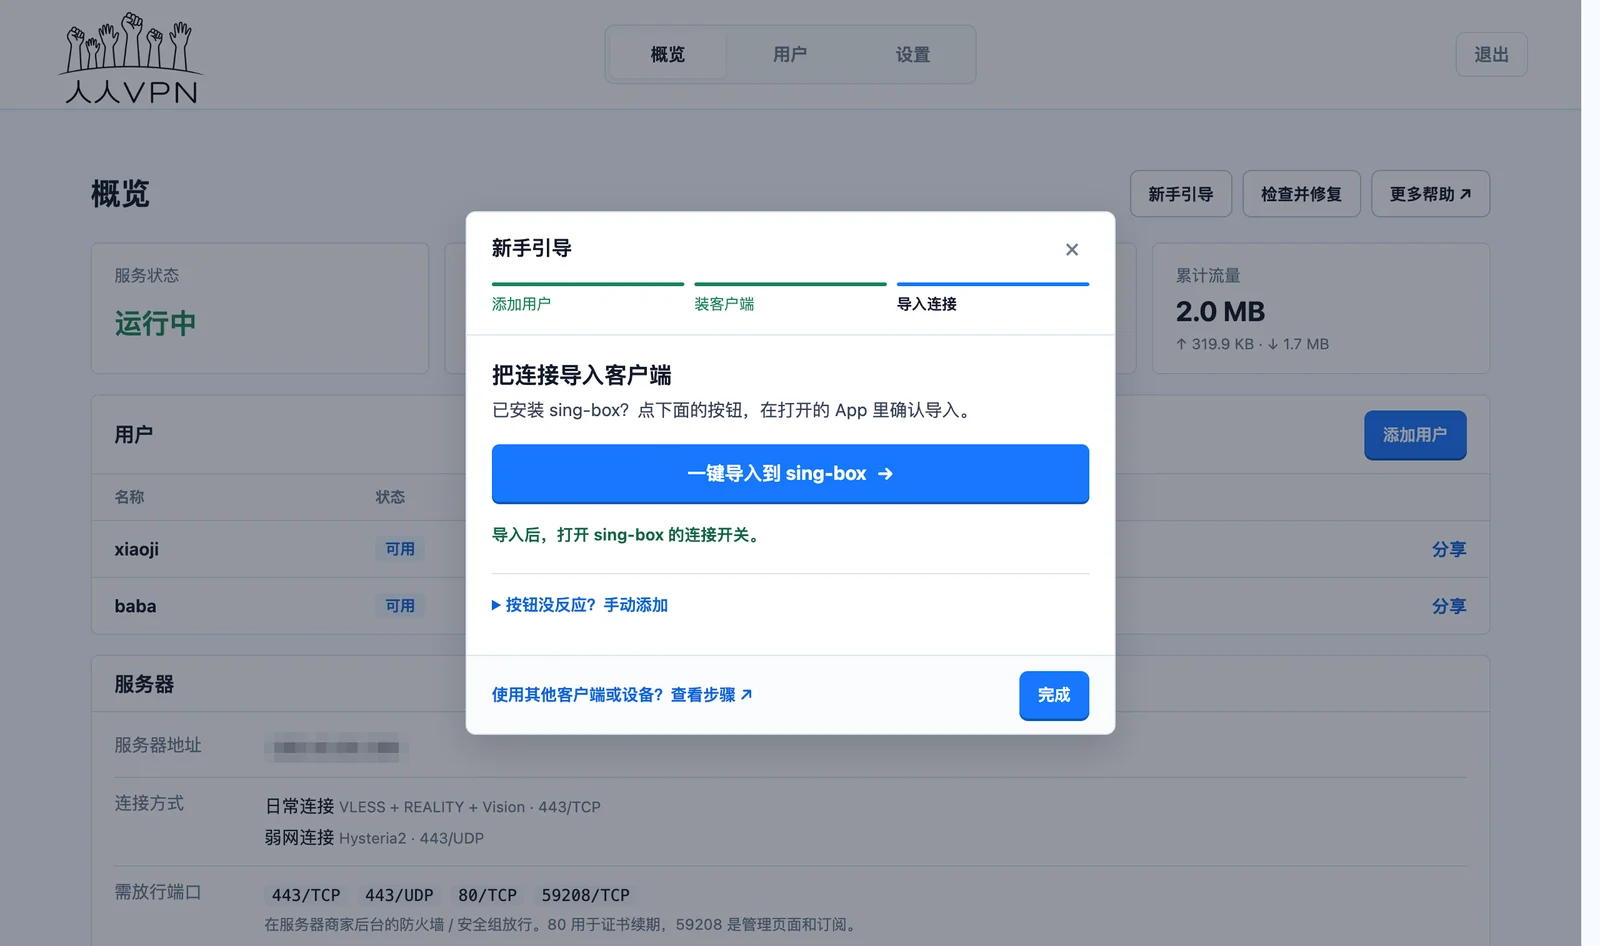
Button not responding? Click “Button not responding? Add manually”, copy the link and paste it into the client manually.
Step 10: Understanding the Management Page
After closing the guide, you will see the “Overview” page:
- Service Status: “Running” indicates that the VPN is working properly.
- Users: A list of all users, their data usage, and last active time.
- Server: Server address, connection method in use, and ports that need to be allowed.
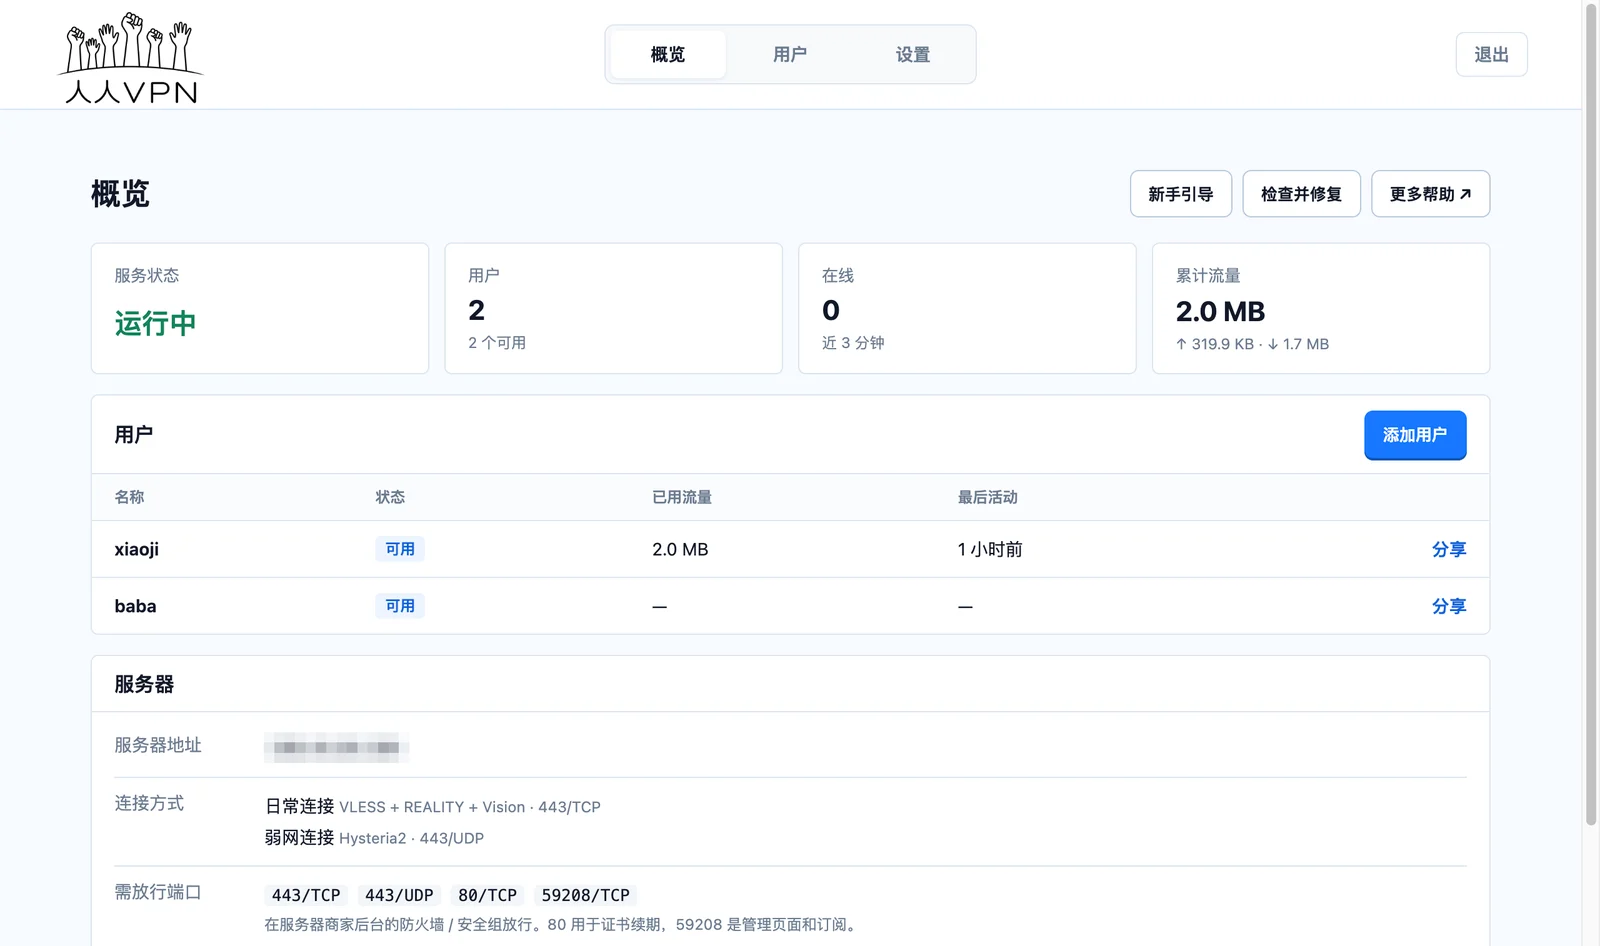
If you cannot connect, first click “Check and Repair” in the upper right corner. It will automatically rebuild the configuration and restart the service.
Step 11: Share the VPN with family and friends
Click “Users” at the top to expand a user and see the content to send to the other person:
- Tutorial Link + Access Code: Send to family members who are not tech-savvy. They can open the link, enter the access code, and see a personalized graphical tutorial to follow step-by-step.Please send the link and access code separatelyFor example, send the link via WeChat and tell the access code over the phone. This way, even if the link is seen by others, it cannot be opened.
- Subscription Link / QR Code: Send to those who already know how to use the client. They can directly “Add Subscription” in the client by pasting the link or scanning the QR code.
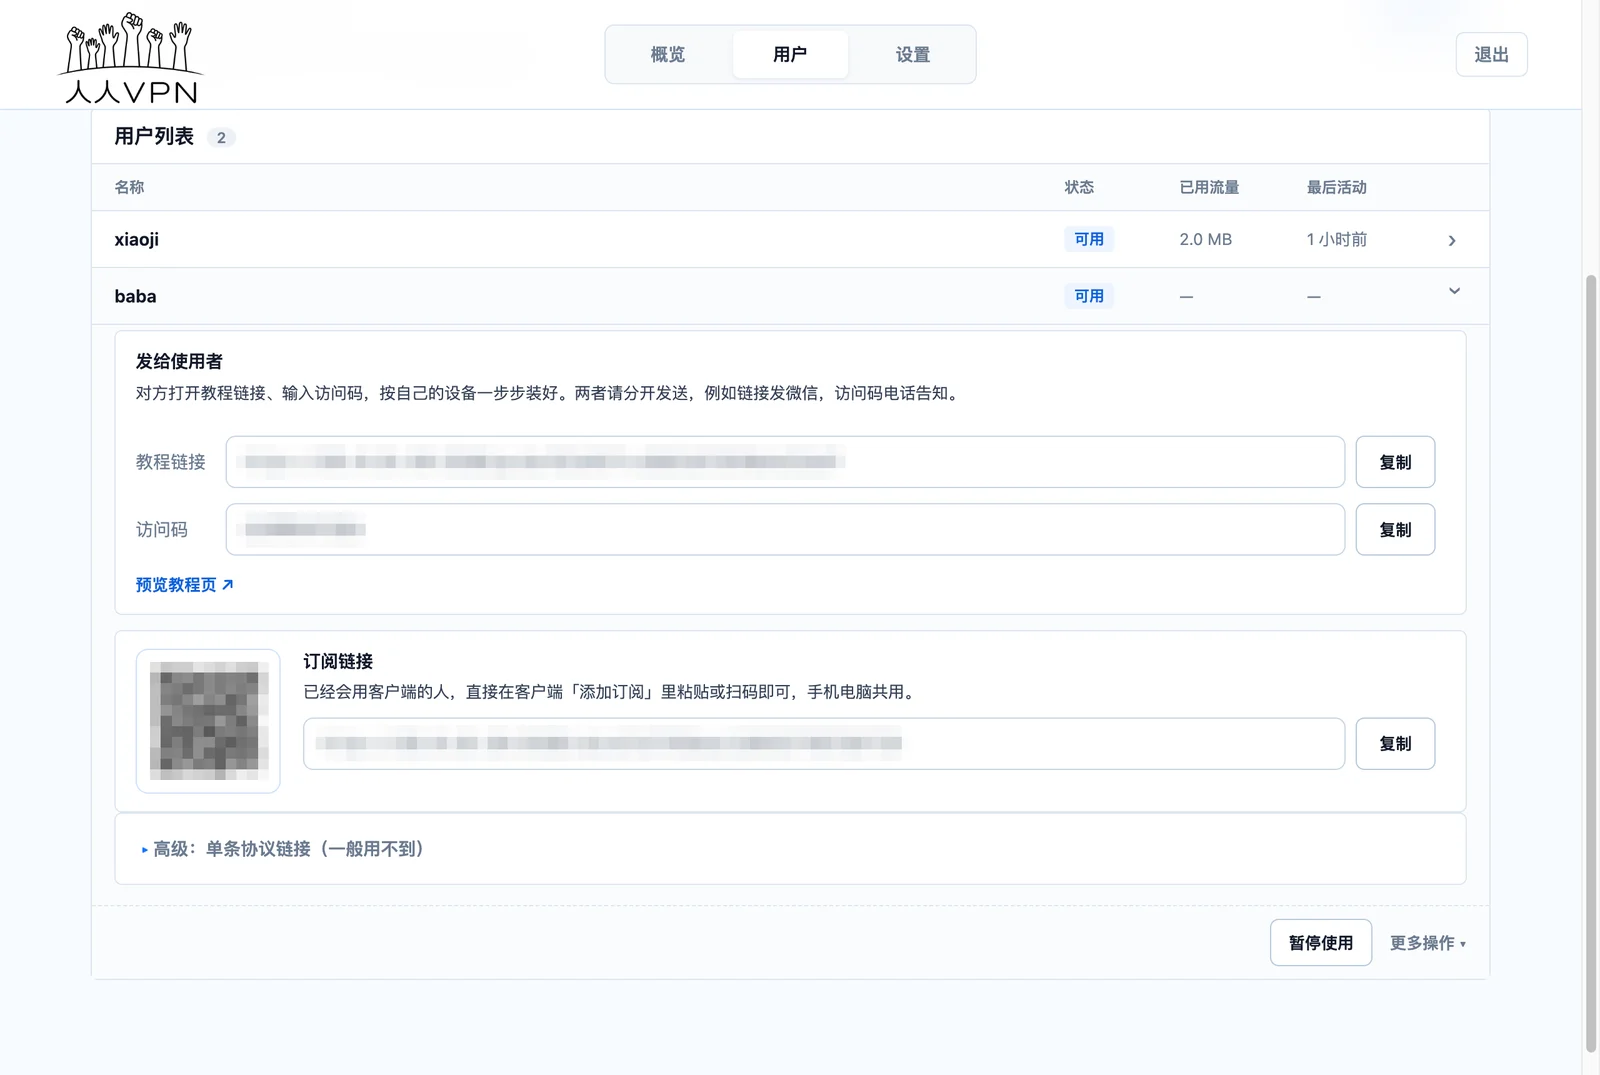
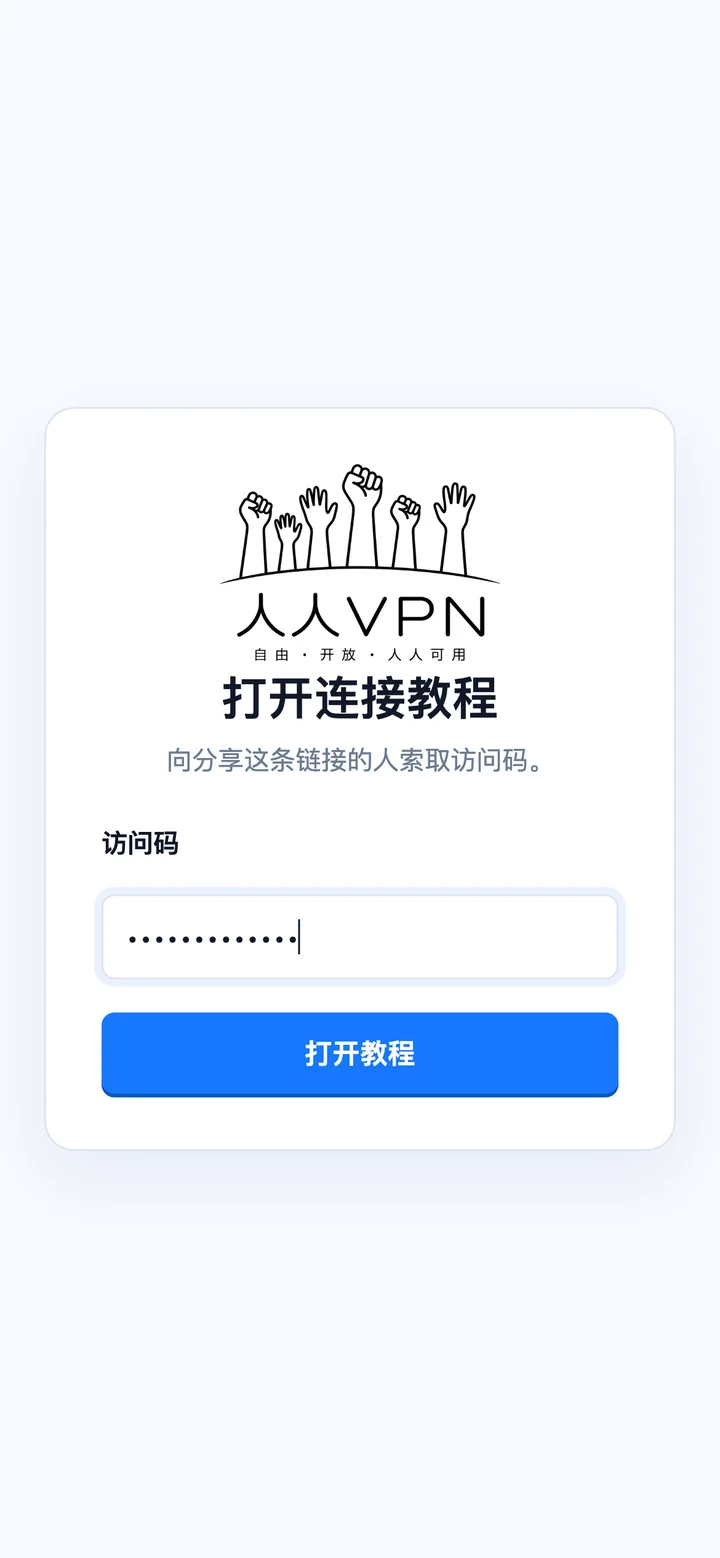
Step 12: What family members will see on their phones
Family members open the tutorial link on their phones and first enter the access code:
Then they can see the exclusive connection tutorial. The page willautomatically identify the phone modeland provide the corresponding client download address. It only takes three steps:Install client → One-click import → Turn on connection switch.
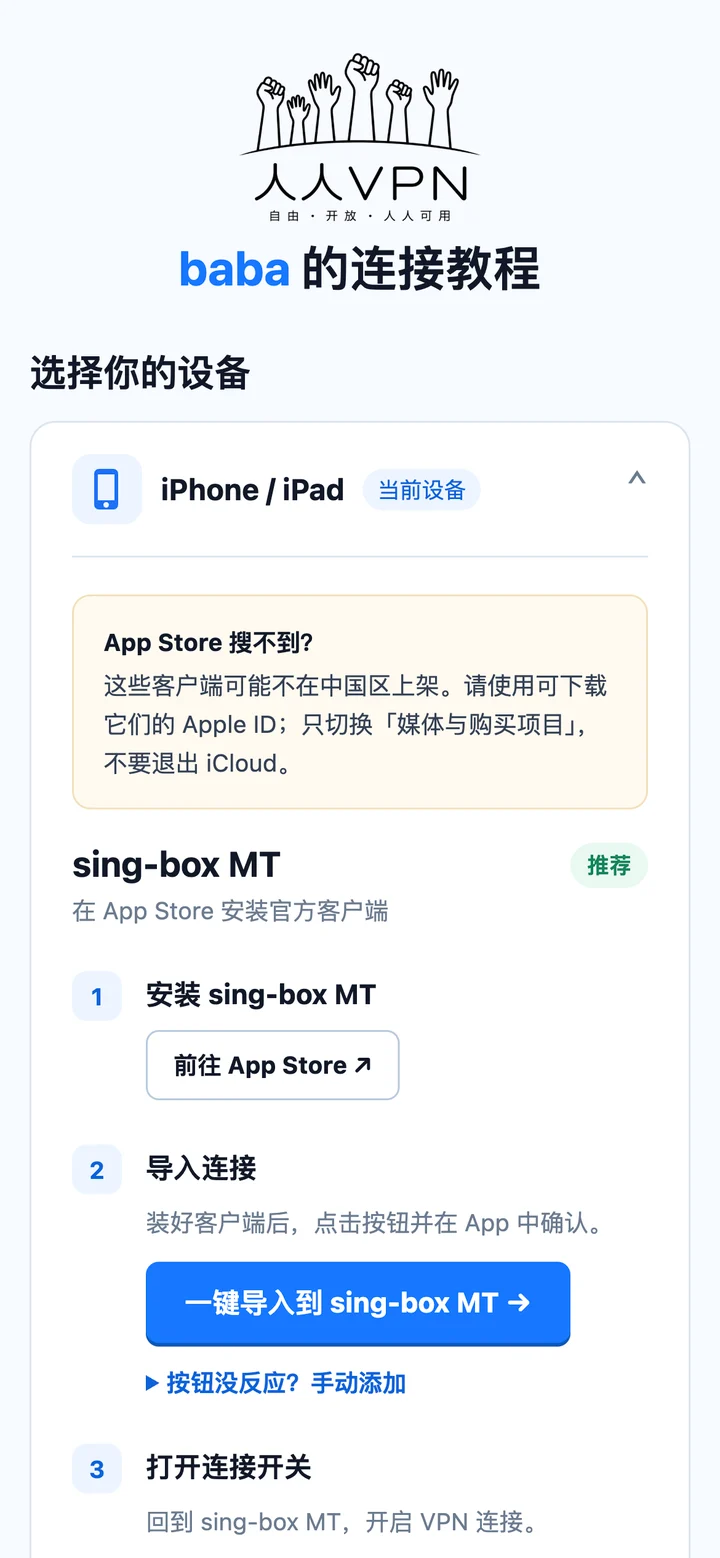
iPhone users please note: The recommended client cannot be found in the App Store in the China region and requires the use of an Apple ID from an overseas region for download.
Daily maintenance
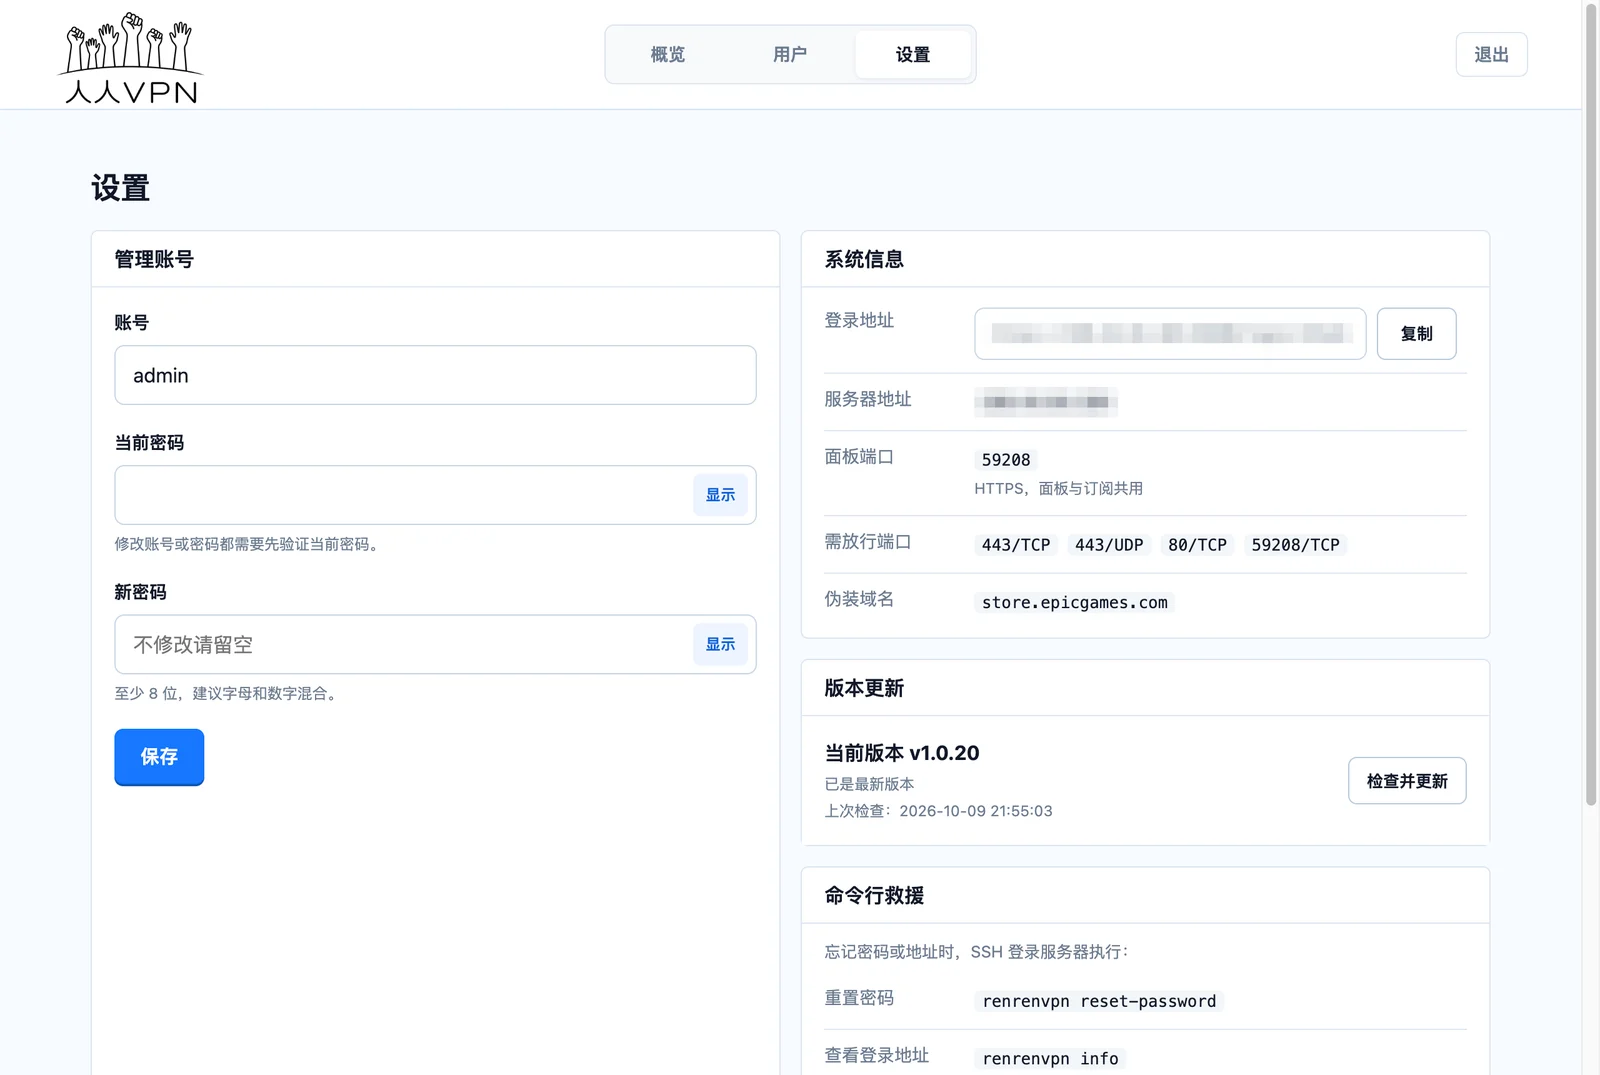
In the “Settings” page at the top, you can:
- Modify management account and password.
- View login address, server address, and port.
- One-click update: Click “Check for and install updates”. If a new version is available, it will automatically update in about 1 minute. During the update, the account, users, and subscription link will remain unchanged. If the update fails, it will automatically revert to the original version.
Frequently Asked Questions
1. Installed but cannot connect?
Ninety percent is that the firewall (security group) of the server provider's backend has not released the port. Please release the ports one by one according to the ports listed in the overview page's "Ports to Release". If you still cannot connect after releasing, click "Check and Repair" on the overview page.
2. Forgot the management page address or password?
Log in to the server via SSH and runrenrenvpn info to view the address, runrenrenvpn reset-password to reset the password.
3. Displaying zero nodes after import?
You might be using Clash Verge or Clash Meta, which do not support this subscription format. Please switch to the client recommended on the management page (sing-box, Karing, v2rayN, v2rayNG).
4. What to do if the server IP is blocked?
Change to a new IP in the server provider's backend, or switch to another server, and then go tohttps://renrenvpn.com/ to reinstall. After changing the IP, everyone's connection information will change and needs to be resent to them.
5. Does it cost money?
RenrenVPN is completely free. You only need to pay for the server, and the fees are paid directly to the server provider.
Written at the end
RenrenVPN is made by自由档案馆 and is freely available to everyone, with completely open-source code:https://github.com/iwantruncom/renrenVPN
In an era where information is blocked by high walls and truth is selectively obscured, tools themselves can become a small but concrete form of resistance. Let more people trapped in information cocoons have the possibility to access the real world.
👉 Start now:https://renrenvpn.com/